OTA Information
OTA Firmware Loading Procedure
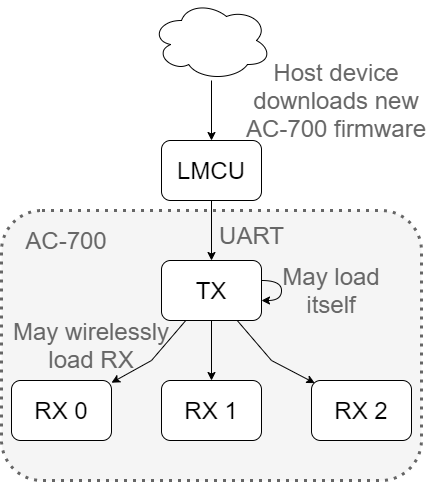
AC-700 is able to stream a firmware image from a TX to itself or to any bonded RX’s using the wireless connection. The firmware image comes from the LMCU and is communicated to the TX via a UART bus through the API interface. A subset of APIs are used specifically for communicating the new firmware to the correct destination. The following block diagram shows how this system can be set up.
The start of the OTA process must be signalled by a load API. This API gets the internal OTA system ready to accept data. The TX and RXs each have a number of partitions which will depend on each product. The devices are able to boot into any one of the partitions. This allows the device to load firmware into a partition that is currently not in use and then boot into it later. Loading firmware this way is reliable because if the OTA procedure fails, the device can still reboot into an uncorrupted image.
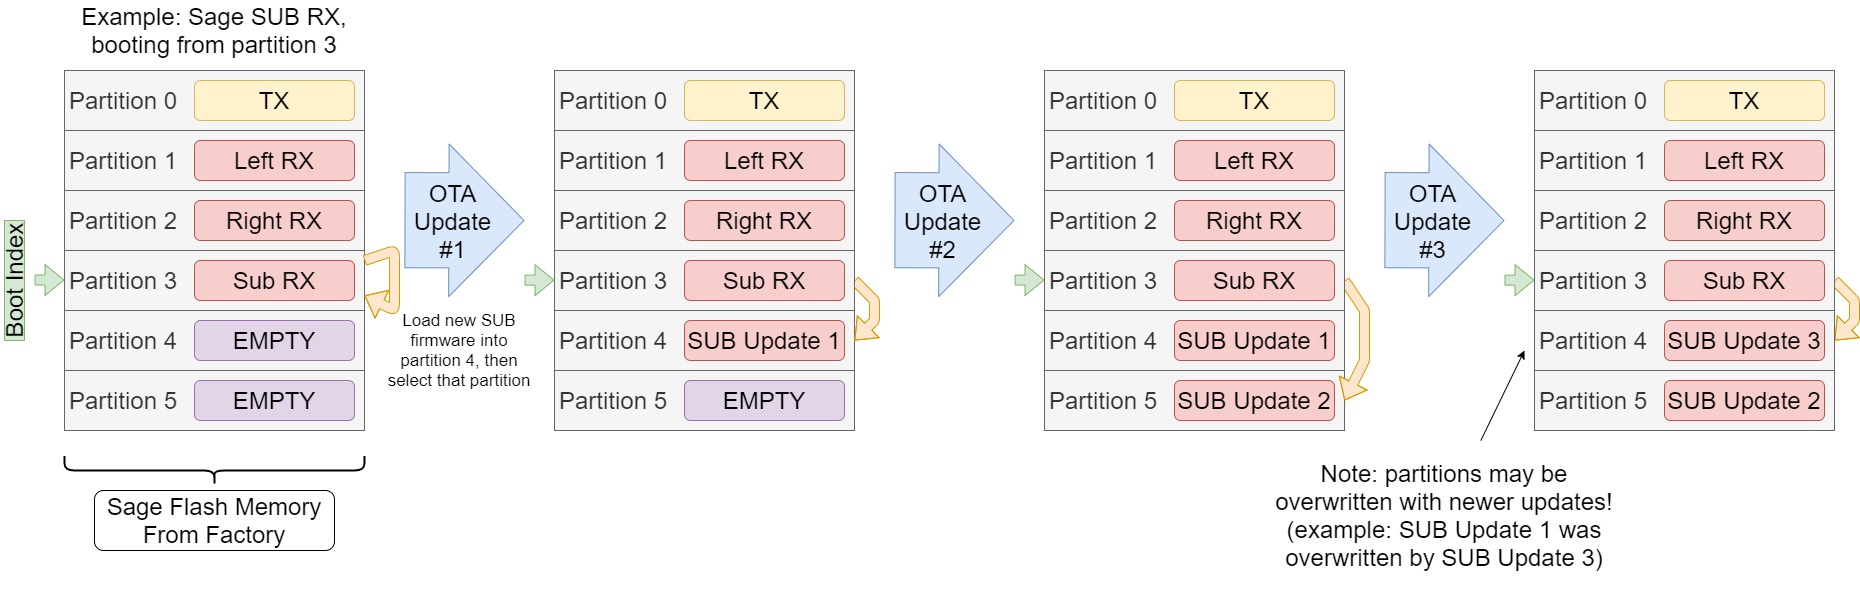
Here is an example of a TX update and the partition layout for a device that supports a TX / 3RX multiboot system. Note that partitions 0 to 3 are read-only. They serve as a backup that can be restored at any time in the event of a failure in partition 4 or 5. The device will actually always boot into one of the read-only partitions (0 to 3), and reboot into 4 or 5 if there is an image available. This reboot process can be interrupted by the user if they wish to recover the original firmware.
The next stage of the API load is the loop where data from the new firmware image is communicated. The loading process uses a paging system, with each page equal to 64 bytes. The page number must be communicated by using the PartitionPage API, followed by a set of 8 DataChunk APIs. There are two different APIs used in this stage, DataChunk0 and DataChunk1. Data must be sent using these APIs in an alternating pattern. Sending data using these alternating APIs adds parity which helps prevent data corruption. Both DataChunk0 and DataChunk1 APIs contain 8 sequential bytes of the firmware image which means the set of 8 DataChunk APIs has communicated a total of 64 bytes (1 page) of the firmware image. After a complete page write, the AC-700 system will then emit a checksum response after 8 DataChunk APIs have been received successfully. The checksum is simply the 16-bit sum of the previous 64 bytes.
The LMCU may optionally use this checksum to verify that the data was received correctly. The LMCU should wait for this checksum response before continuing to the next step. If no errors are detected, then the LMCU should update the AC-700 with the new page number, and continue streaming the next page. If there was an error, the LMCU can retry sending the same page.
Once the end of the image has been communicated to the target device, the LMCU may instruct that device to select the new partition, and then trigger a soft reset so the device boots into the new image. Each of the APIs described here are enumerated in the API List section of this document. Note that each API has a TX and RX version. This entire process is shown in the next figure.

Recovery / OTA Mode
The OTA functionality is only enabled in some cases. To enable the OTA process, the user must hold down a specified button during bootup to signal that OTA should be enabled. This process will cause the device to interrupt the reboot process and remain in the read-only factory image. OTA will be enabled for the duration the device remains turned on.
Below is an example of a device that uses the “power down prep” (PDP) signal to enable OTA. In this example, the user holds the PDP button for 10 seconds to enable OTA. Holding PDP for less than 10 seconds will allow the device to boot into it’s expected partition.

This same process can also be used to recover from a corrupted image which is why it may also be called “Recovery Mode”. For example, if the user has noticed the device stopped working after an OTA load, they can go through this process to boot into the read-only factory image. This will allow their device to function again, and they may retry the OTA process.
Checking The Version of a HOFF
A HOFF file contains a version number that can be checked against the current version running on a AC-700 device. To check the version number of a HOFF, the following command may be used:
sxc-hofftool --display my_firmware.hoff
This will return some information in the terminal. The important information is highlighted below:
Metadata:
libspine_hashsum = 810c890733d4e4126aa700a05fc6ca9ed9c76788-dirty
product_driver_hashsum = 2618b9928be6b4737a083286ce8c6e27bfa591eb
product_driver_name = MyProductDriver
skaa-dionysus_hashsum = v2.6.0-118-g867ba43fc003c51819478dd4df4d45a16ac56349
The highlighted “skaa-dionysus_hashsum” should be compared to the version that is returned by either a gTSV or nRSV API. These APIs are described in the API list in this document.